You would be seeing a warning message in your AdMob page, to add app-ads.txt file in your website to protect your apps revenue. we will know how to get rid of that message by the end of this page. First we will study about app-ads.txt file.
What is app-ads.txt?
Authorized Sellers or app-ads.txt, is an IAB (Interactive Advertising Bureau) Tech Lab initiative designed for protecting app ad inventory. It helps ensure your app ad inventory is only sold through channels you have identified as authorized by specifying in the txt file.
Creating app-ads.txt file gives you more control who's allowed to sell ads on your app and helps prevent online ad fraud. App publishers can do this by adding the app-ads.txt file to their website, and specifying website URL in the app store listing.
Example of app-ads.txt file format:
Your app-ads.txt file must be formatted as specified by the IAB Tech Lab in order to be verified. But don't be panic. Your Admob provides a personalized code snippet that makes it easier to setup your app-ads.txt file. Learn more about how to create app-ads.txt file for your Admob account.
Is it mandatory to setup app-ads.txt ?
No. But is highly recommended, especially if you are concerned that others may be targeting your brand through misrepresented app inventory.
Now, we will see how to setup the file for your apps from the following 5 simple steps.
Step 1: Create app-ads.txt file
As shown in the example app-ads.txt file your Publisher ID must be included and formatted correctly for your file to be verified.
To get your personalized code snippet of app-ads.txt file:
- Sign in to your Admob account.
- Click Apps in the side bar.
- Click View all apps from the menu.
- Click the app-ads.txt tab.
- Click How to setup app-ads.txt.
- Click
 to next to the code snippet to copy.
 - Paste the code snippet into a txt file and save it as app-ads.txt.
Step 2: Establish your developer website
If you already own a website you can skip this step and go to Step3.
If you don't have a website for your developer account, you have to create one. For this first you have to purchase a domain name. ex: google.com. And to upload app-ads.txt file you need to purchase hosting server as well.
Some sites offer free domain name with hosting server purchase. Ex: GoDaddy, Namecheap. Some offer free hosting servers as well Ex: Hostinger, 000webhost, Freehosting. But think twice before you buy any domain & hosting server purchase as they might offer more affordable first year prices, but their monthly and yearly renewal prices are much higher. Avoid free services as they are not reliable at all. They will have more down time of your site and sometimes they may delete your website automatically. I personally prefer "Google Domains" to register the domain name because of easy integration with any DNS servers, reliable as it is from google and also it provides free tool "Blogger" to help you build your own website home without any coding knowledge.
In this blog I will explain how to create a website without spending money from your pocket even to purchase domain name. This can be done with Blogger. Blogger gives you free website URL with subdomain like mywebsite.blogspot.com. Here mywebsite is your website name that you want to specify for your developer account, blogspot is subdomain name from blogger which you can not avoid for free sites.
Note: If you want to have a professional website to meet maximum customers for your apps, purchase a domain name.
No need of any registration to create a blogger account.
1. Open Blogger site and use your developer console login credentials or any gmail login credentials to login.
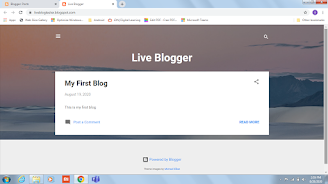
3. You can see the blogger home page with the name you have chosen for your blog. Now click on the "view blog" option.
5. If you add any 'new post' and 'publish' that will reflect in your website home page.
Now you have a website created for your developer account.
Step 3: Add your developer website in your app store listing
To add your developer website in your app store listing:
- Google Play: Add the website URL in the contact information of your app listing:
- Sign in to your Google Play Console account.
- Select an app.
- On the left menu, click Store Presence -> Store listing.
- Scroll to Contact Details.
- Add your developer website URL.
- For Apple App Store: Add your developer website in the marketing URL field of your store listing.
If you add or update a developer website within a store listing, it will take some time before AdMob detects those changes:
| Store | Detection delay |
| Google Play | Allow up to 24 hours |
| Apple App Store | Allow up to 7 days |
Step 4: Upload app-ads.txt file on your developer website
In accordance with the app-ads.txt specification, the Admob crawler will look for files at the following URL patterns.
- https://<<hostname>>/app-ads.txt
- http://<<hostname>>/app-ads.txt
The following example shows general examples of where the Admob crawler look for an app-ads.txt for different developer website URLs.
|
If
the developer website is:
|
Crawler
looks in the following order:
|
|
https://example.com/game
|
https://example.com/app-ads.txt
http://example.com/app-ads.txt |
|
http://help.example.com/game
|
https://help.example.com/app-ads.txt
http://help.example.com/app-ads.txt https://example.com/app-ads.txt http://example.com/app-ads.txt |
|
http://support.help.example.com/game
|
https://help.example.com/app-ads.txt
http://help.example.com/app-ads.txt https://example.com/app-ads.txt http://example.com/app-ads.txt
Note:
"help.example.com" is at the first subdomain level
and used for crawling, while “support.help.example.com” is at
the second subdomain level and not used for crawling.
|
|
https://www.example.com/game
|
https://example.com/app-ads.txt
http://example.com/app-ads.txt
Note: The specification excludes "www." and "m." subdomainsas locations where crawlers will look for files.
|
|
https://m.example.com/game
|
https://example.com/app-ads.txt
http://example.com/app-ads.txt
Note: The specification excludes "www." and "m." subdomainsas locations where crawlers will look for files.
|
If you created the website using Step2 procedure, follow the steps given below to upload the app-ads.txt file to your website.
1. Sign in to Blogger.
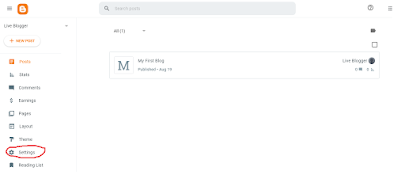
2. From the menu on the left, click Settings.
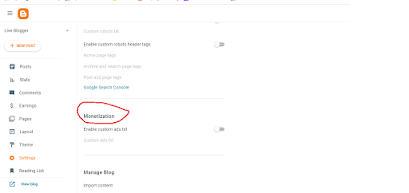
3. Go to Monetization option.
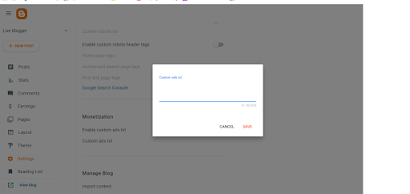
4. Turn on Enable custom ads.txt. click Custom ads.txt.
5. Copy app-ads.txt file code snippet saved from Step1 and paste in the textbox.
6. Click Save.
To check the content of your ads.txt file, go to https://<your blog address>/ads.txt.
Step 5: Check that your app-ads.txt file is verified in your Admob account
After adding your website URL in the Google Play Store listing, it can take up to 24 hours for AdMob to crawl and verify your app-ads.txt file. Wait at least 24 hours for the app-ads.txt status to update.
If you have recently added a developer website and updated your app listing, AdMob will take some time to detect these changes.
| Store | Detection delay |
| Google Play | Up to 24 hours |
| Apple App Store | Up to 7 days |
You can also request AdMob to crawl your app for a faster response:
- Sign in to your AdMob account.
- Click Apps in the sidebar.
- Click View all apps.
- Click the app-ads.txt tab.
- In the row of the app you want to see details for, click
. this will open additional details and the option to request AdMob to crawl your app.
- Click Check for updates button.
AdMob will update the status for all apps that share the same app-ads.txt file. In some cases, the "Check for updates" button may be unavailable. But note that Admob routinely crawls your latest file for updates.
Once the status is updated you can view a screen with the details of the app-ads.txt file for all of your apps in AdMob.
The table below shows the different types of app-ads.txt file statuses and what they mean.
| Status | What it means |
| The app-ads.txt file is found and verified. AdMob crawled and verified your app-ads.txt file. | |
| No app-ads.txt file is found for this app. | |
There is an issue with your app-ads.txt file. Your revenue is at risk. |
If your file isn't found and verified, carefully review these details to determine what the issue is and how to fix it. Learn more about troubleshooting app-ads.txt issues.


Comments
Post a Comment